Friday, 17 November 2017

Building Unreal Engine projects from the solution using MSBuild

If you want to use MSBuild to build UE4 projects, but need to build them from within the solution instead of specifying the vcxproj file (which doesn't always work correctly), you need to use the "Target" /t: command line parameter, like so:

"path to MSBuild.exe" /t:Engine\UE4 /p:Configuration="Development Editor" /p:Platform=Win64 UE4.sln

Key things to note:
  • the configuration and platform specifiers are Solution-style, with spaces instead of underscores, and Win64 instead of x64 etc.
  • The solution folder path must be specified in the target parameter, otherwise MSBuild will not recognize the project name.

Saturday, 3 June 2017

Advanced custom Qt Container Widgets and Qt Designer

Qt has a nice UI editor called Designer, and you can create custom widgets that go in Designer's toolkit. But the only example I've ever found is this one in the Qt docs, which doesn't explain how to create container widgets.

The problem is to create a widget that contains some decoration or controls, but also has a sub-window where people can put their own widgets.

For example, I wanted an "accordion" control that had a checkbox at the top to open and close it, then to be able to put any other control inside this.

The way it will be structured is a QAccordion, with a VBoxLayout, will contain a QCheckbox and a QWidget called the content widget. This content widget will have its own VBoxLayout, where the controls will go.

You will create two classes: one called (say) QAccordion, which implements the widget, and one called QAccordionInterface, which tells Designer that it's available.


<#include <qwidget>
#include "GeneratedFiles/ui_QAccordion.h"
#include "Export.h"

class SIMUL_QT_WIDGETS_EXPORT QAccordion : public QWidget
{
 Q_OBJECT
  
 Q_PROPERTY(QString title READ title WRITE setTitle DESIGNABLE true)
 Q_PROPERTY(bool open READ isOpen WRITE setOpen DESIGNABLE true)
public:
 QAccordion(QWidget *parent = 0);
 ~QAccordion();
 void setTitle(QString f);
 QString title() const;
 void setOpen(bool o);
 bool isOpen() const;
public slots:
 void on_accordionCheckBox_toggled();
 void setSearchText(const QString &);
signals:
protected:
 void childEvent ( QChildEvent * event ) override;
 void paintEvent(QPaintEvent *) override;
private:
 Ui::Accordion ui;
 bool setup_complete;
 QWidget *contentsWidget;
 void hookupContentsWidget();
};

The subclass Ui::Accordion shows that I created the basic class in Designer itself. This is optional, but the QAccordion.ui file is just:

<?xml version="1.0" encoding="UTF-8"?>
<ui version="4.0">
 <class>Accordion</class>
 <widget class="QWidget" name="Accordion">
  <property name="geometry">
   <rect>
    <x>0</x>
    <y>0</y>
    <width>671</width>
    <height>336</height>
   </rect>
  </property>
  <property name="sizePolicy">
   <sizepolicy hsizetype="Preferred" vsizetype="Preferred">
    <horstretch>0</horstretch>
    <verstretch>0</verstretch>
   </sizepolicy>
  </property>
  <property name="windowTitle">
   <string>Accordion</string>
  </property>
  <layout class="QVBoxLayout" name="verticalLayout">
   <item>
    <widget class="QCheckBox" name="accordionCheckBox">
     <property name="text">
      <string>Accordion</string>
     </property>
     <property name="checked">
      <bool>true</bool>
     </property>
    </widget>
   </item>
  </layout>
 </widget>
 <resources/>
 <connections/>
</ui>

By putting the layout and checkbox in the ui file, they will be created in code, in Ui::Accordion.

But: if we were to create the whole thing, including the contents widget in here, after we built the class the contents widget would NOT be accessible in Designer, and neither would its layout be recognized. So instead we put these in a function called domXml in QAccordionInterface.

 QString QAccordionInterface::domXml() const
 {
     return "<ui language=\"c++\">\n"
            " <widget class=\"QAccordion\" name=\"accordion\">\n"
            "  <property name=\"geometry\">\n"
            "   <rect>\n"
            "    <x>0</x>\n"
            "    <y>0</y>\n"
            "    <width>100</width>\n"
            "    <height>24</height>\n"
            "   </rect>\n"
            "  </property>\n"
            "  <property name=\"toolTip\" >\n"
            "   <string></string>\n"
            "  </property>\n"
            "  <property name=\"whatsThis\" >\n"
            "   <string>.</string>\n"
            "  </property>\n"
      "  <widget class=\"QWidget\" name=\"contentsWidget\" native=\"true\" >\n"
      "   <layout class=\"QVBoxLayout\" name=\"accContentsVLayout\">\n"
      "    <property name=\"spacing\">\n"
      "     <number>2</number>\n"
      "    </property>\n"
      "    <property name=\"leftMargin\">\n"
      "     <number>2</number>\n"
      "    </property>\n"
      "    <property name=\"topMargin\">\n"
      "     <number>2</number>\n"
      "    </property>\n"
      "    <property name=\"rightMargin\">\n"
      "     <number>2</number>\n"
      "    </property>\n"
      "    <property name=\"bottomMargin\">\n"
      "     <number>2</number>\n"
      "    </property>\n"
       "    </layout>\n"
      "  </widget>\n"
            " </widget>\n"
            "</ui>\n";
 }

By specifying the contents widget and its layout here, Designer will know to dynamically create them when you add a QAccordion, so they'll appear in the editor. You can then drag any control into the contents widget, and it will be correctly positioned. Be careful that you drag it to the contents widget and not the QAccordion itself or a subcontrol. Designer doesn't properly obey its "isContainer" function, so it sees any custom control as a container, not just the ones you indicate.

So now in designer, we can add QAccordions. Without styling they just look like checkboxes with a space below where you can drag controls:


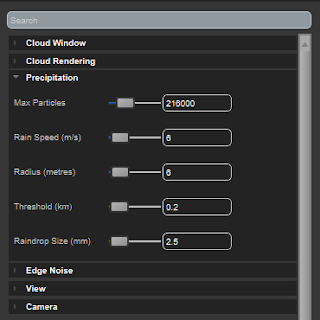
After applying some styling, the final result looks like this:

The accordion elements - Cloud Window, Precipitation etc are inside a searchable property panel, implemented on the same principles.

And here are the files for the final class:

QAccordion.zip

Saturday, 20 May 2017

Sfx: a generic effect compiler for shaders

So Microsoft, Nvidia and the rest used to support effect files: a text source file that contained multiple shaders, but also "techniques" and "passes", where each pass can have state specified: blending, rasterization etc.

Some time ago, for reasons I guess of supply and demand, fx fell out of fashion. Microsoft still provides the D3D11 version of its Effects library as open source here, and this reads binary output that the fxc tool can create. But Fxc is being replaced by by this, which doesn't support effects. Nvidia's Tristan Lorach proposed a new framework, nvFX (pdf), but I don't think it's under active development.

D3D12 has no effect support. So we need to add it.

My approach at Simul is called Sfx. The idea is to take an initial file that's compatible with Microsoft's HLSL effect format, with the code written in HLSL. Sfx will extract the passes and compile all the relevant shaders by building smaller individual shader source files and calling an external compiler. A small json file will specify which compiler to use, and various other parameters to allow translation from HLSL to whatever language the compiler expects.

For example, HLSL.json looks like:

{
  "compiler": "C:/Program Files (x86)/Windows Kits/10/bin/x64/fxc.exe",
  "defaultOptions": "/T {shader_model} /nologo",
  "sourceExtension": "hlsl",
  "outputExtension": "cso",
 "outputOption": "/Fo",
 "entryPointOption":  "/E{name}",
  "multiplePixelOutputFormats": false
}

So Sfx should be compiler-independent. It outputs two things: a text file with the .sfxo extension, and a number of platform-specific shader binaries. The sfxo looks like this:

SFX
texture fontTexture 2d read_only 0 single
SamplerState clampSamplerState 9,LINEAR,CLAMP,CLAMP,CLAMP,
SamplerState cmcNearestSamplerState 13,POINT,CLAMP,MIRROR,CLAMP,
RasterizerState RenderNoCull (false,CULL_NONE,0,0,false,FILL_SOLID,true,false,false,0)
RasterizerState wireframeRasterizer (true,CULL_NONE,0,0,false,FILL_WIREFRAME,false,false,false,0)
BlendState AlphaBlendRGB false,(true),1,1,4,5,0,0,(7)
DepthStencilState DisableDepth false,0,4
group 
{
 technique backg
 {
  pass p0
  {
   rasterizer: RenderNoCull
   depthstencil: DisableDepth 0
   blend: AlphaBlendRGB (0,0,0,0) 4294967295
   vertex: font_FontVertexShader_vv.cso,(),(),()
   pixel: font_FontPixelShader.cso,(),(),()
  }
 }
}

This stands to improve over time. In this case, we've taken an sfx file containing this definition:

VertexShader vs = CompileShader(vs_4_0, FontVertexShader());
technique text
{
    pass p0
    {
  SetRasterizerState( RenderNoCull );
  SetDepthStencilState( DisableDepth, 0 );
  SetBlendState(AddBlendRGB,vec4( 0.0, 0.0, 0.0, 0.0), 0xFFFFFFFF );
         SetGeometryShader(NULL);
  SetVertexShader(vs);
  SetPixelShader(CompileShader(ps_4_0,FontPixelShader()));
    }
}


so we've compiled FontPixelShader() and FontVertexShader() into the cso files: this example is for HLSL. As we extend Sfx to other languages, the json definition in particular will become more complex - possibly using regexes to specify how HLSL is translated into other C-style shader languages.

Thursday, 18 May 2017

HDR output in Unreal Engine

To get Unreal Engine to output from consoles in HDR format (i.e. to HDR TV's), there are a few settings. according to this post, there are variables that can go in the .ini files. But in my experience, setting EnableHDROutput to 1 in Engine.ini, causes UE to crash on initialization. As of May 2017, the solution seems to be to either enter the hdr settings every time via the console, or use the Blueprint function EnableHDRDisplayOutput:


This seems to also cover the r.HDR.Display.OutputDevice and r.HDR.Display,ColorGamut settings, so one call will do it.

Sunday, 16 April 2017

cldoc - a promising documentation generator

cldoc needs Python 2, and won't yet work with Python 3. You have to make sure it's at least Python 2.7.9 so that you get pip.exe, which will be needed to install various extras. After installing Python 2, run:

python -m ensurepip --upgrade

to get pip, then:

pip install pyparsing

You might have to do this from C:\Python27\Scripts. If you don't want to replace your Python 3 setup in Path and PYTHONPATH, just calling "pip install", even from the Python 2 directory, will run the pip for Python 3.

You may need the latest Clang: older versions don't all have full support for C++14 features on Windows. http://releases.llvm.org/download.html


Create a Sublime Text build system, called cldoc.sublime-build, and fill it with:
{
 "cmd": ["C:\\Python27\\python.exe","C:\\PATH TO\\cldoc-dev","generate","--","--output","C:/PATH TO/docout","C:/PATH TO/*.h"]
 ,"env": {"PYTHONPATH":"C:\\Python27"}
 ,"working_dir":"C:\\Python27"
,"file_regex": "^(.*)\\:([0-9]*)\\:([0-9]*)\\:"
}

Testing the docs in Windows

To test the documentation website on Windows, you must install Jekyll. Follow the instructions. Watch out for the SSL errors. Once you have jekyll on your Windows machine, you can go to the site directory and call e.g.:
jekyll build --incremental --destination G:/

That destination part is because the links to css files etc start with a slash. So the only way you can test this locally is if the site is at the root of some directory.
Create a small partition on your local drive, and put the site there.

.htaccess for XAMPP:


Options +FollowSymLinks -MultiViews
RewriteEngine On
RewriteBase /
RewriteCond %{REQUEST_URI} !-f
RewriteRule ^([a-zA-Z0-9_-]+)$ $1.html